Wednesday, July 22, 2015

Lychee Golden Sponge Cake

It was my long time girl friend's birthday and I thought of baking a cake for her for the 1st time. She is quite a health conscious lady so I decided to do a light and fruity cake ~ lychee flavored cake with lychee fillings.

I have done lychee cake previously but with normal vanilla chiffon cake recipe as cake base. This time round I decided to use the golden sponge cake recipe as it has a much finer texture and it is really my favorite basic cake at the moment.

As usual, I always like to overcomplicate stuff... haha.. So I thought of doing a dramatic presentation by doing a spin sugar dome cage for decor (a result of watching too much Masterchef Australia). It actually came out very pretty, adding a golden element to the cake, so apt for the golden sponge cake. But I didn't do my research properly and didn't realise spun sugar cannot be prepared in advance or keep in the fridge as it will melt away.. Luckily I was reminded by someone in my baking group, and so I have to remove the spun sugar from the cake. Alas, the cake looks so ordinary without the spun sugar... haha... Nevermind la.. at least I tried.. =)

lychee-golden-sponge-cake-spun-sugar-liancanbake
:: Spun sugar cage adds a dramatic golden presentation to the cake ::


This Lychee Golden Sponge Cake recipe is adapted from the Golden Sponge Cake recipe by Nasi Lemak Lover’s blog. I replaced butter with rice barn oil to make it a healthier choice.

Lychee Golden Sponge Cake Recipe
(6 inch removable base cake pan)

Ingredients:

50g rice barn oil 
50g cake flour (sifted)
6g corn starch (sieved together with cake flour)
3 large egg yolks (my egg size is approx 70g with shell)
55g milk + 1/4 tsp lychee essence 


3 large egg whites (my egg size is approx 70g with shell)
50g caster sugar

How to do:

1. Heat the oil in a saucepan over low heat till it starts to have small bubbles and remove from heat.
2. Add in the sifted flour and stir till combined and transfer to a clean mixing bowl.
3. Add in the milk and mix till well combined.
4. Add in the yolk one by one and mix well with each addition.
5. In another clean, dry and grease-free bowl, beat the egg whites till till foamy and add in the sugar.
5. Continue to beat till the meringue mixture becomes white, shiny and attain firm peak.
6. Mix in 1/3 of the meringue to the yolk mixture to thin the mixture.
7. Fold in the remaining 2/3 meringue gently in 2 installments.
8. Pour into the cake pan at one position slowly and shake the pan gently when done to level the cake batter.
9. Bake in a pre-heated oven at 145 degree* (on oven thermometer, oven dial shows 120 degree) for 50 min or till the skewer comes out clean.
10. Invert the cake pan and let it completely cool before remove from pan.

*Please use your usual chiffon cake baking temperature as each oven is different. I am still experimenting with mine, hoping to get a non crack cake. 

The cake is then chilled, layered and filled with whip cream and canned lychee fruits. I used 1& 1/2 can as I had 2 layers of fillings and non dairy whip cream about 150 ml. 
The cake is chilled first so that it get a bit firmer and easier for slicing.

The cake itself is not a very sweet cake, so it tasted just nice when paired with the sweetness of the lychee fruit and whip cream. If you intend to have it on its own or if you have a sweet tooth, can increase the sugar a bit.

The lychee aroma of the cake is very strong. When my friend opened the cake box, the first thing she said is that the cake has a very fragrant lychee aroma. After tasting it, she commented that texture tasted like cheese cake, very soft and fluffy. As we had a very full dinner, we only managed to finished up half the cake. My friend took back the other half and she whatsapp me 1 hour later that her hubby actually devoured the remaining half.

I am extremely overjoyed because her hubby is known to have a high standard when it comes to food. This recipe is definitely a keeper!

:: The presentation without spun sugar ::
It's a pity that my friends didn't get to see the original presentation with the spun sugar. Can only look at the pretty photo.. haha.. Perhaps next time when they come over to my place, I shall attempt again.  

spun-sugar-lychee-cake-liancanbake.blogspot.sg
:: So pretty but a pity it doesn't last ::

Monday, July 20, 2015

Surprise Hearts in Chocolate Sponge Cake with Ganache


My bro whatsapp me on Thu: ‘Sis, can I order a cake from you? Small small ok le. =)’

Me: ‘Can, What cake you want? Need décor? For what occasion?’

Bro: ‘Jolene (his gf) birthday. If is just chocolate cake will it be abit dull huh?’

Me: ‘She cannot eat strawberries right?’

Bro: ‘Cannot, Kiwi also cannot.’

Me: ‘Raspberry?’

Bro: ‘She never eat before.’

Me: ‘ok.. think better not.. like same family with strawberry.. I see what I can do ba..’

I usually fill and decorate chocolate cake with strawberries & raspberries because they taste so good together and the red is so pretty on chocolate. But his gf is allergic to strawberries, so I have to think of something else.

Me: When you need the cake?

Bro: ‘This Sunday..’

Faint.. my bro didn’t give me much time to work with. My bro gf is a very sweet girl and always come and help me babysit so I really wanted to do a nice cake for her. And suddenly a wonderful idea came into my mind. How about baking a cake with has hearts in the center? Hm… sound intriguing.. but I don’t have the special mould.. So I went on Google and found a tutorial that teaches how to do it manually. I decided to take a huge risk in trying it out.

When I handed the cake to my bro on Sunday afternoon, I told him that if when his gf cut open the cake and it didn’t show a nice heart shape, don’t tell her gf it’s meant to be a heart shaped.. hahha…

And then I waited the whole day till finally he sent me the photos late at night. It’s a success! I am super happy that the risk paid off!

Not only is the hearts in the cake a beautiful surprise, the cake also received rave feedback from his gf family.

surprise-heart-in-center-cake-sylviasang
:: Surprise hearts embedded inside the cake ::

And so another pretty recipe to archive here!

This Surprise Hearts in Center Chocolate Cake require me to bake two cakes and have a lot of patience. I personally find the difficulty level is pretty high as I don’t have 100% success rate at baking cake.

First, I had to bake a cake for the pink hearts. The recipe that I used is the Golden Sponge Cake recipe from Nasi Lemak Lover’s blog.

Golden Sponge Cake Recipe
(6 inch removable base cake pan)

Ingredients:

50g butter (I used non-salted)
50g cake flour (sifted)
6g corn starch (sieved together with cake flour)
3 large egg yolks (my egg size is approx 70g with shell)
55g milk + a few drops of vanilla extract & pink color coloring (or any other colors of your choice)


3 large egg whites (my egg size is approx 70g with shell)
50g caster sugar

How to do:

1. Melt the butter in a saucepan till it starts to have small bubbles and remove from heat.
2. Add in the sifted flour and stir till combined and transfer to a clean mixing bowl.
3. Add in the milk and mix till well combined.
4. Add in the yolk one by one and mix well with each addition.
5. In another clean, dry and grease-free bowl, beat the egg whites till till foamy and add the sugar in
5. Continue to beat till the meringue mixture becomes white, shiny and attain firm peak.
6. Mix in 1/3 of the meringue to the yolk mixture to thin the mixture.
7. Fold in the remaining 2/3 meringue gently in 2 installments.
8. Pour into the cake pan at one position slowly and shake the pan gently when done to level the cake batter.
9. Bake in a pre-heated oven at 145 degree* (on oven thermometer, oven dial shows 120 degree) for 50 min or till the skewer comes out clean.
10. Invert the cake pan and let it completely cool before remove from pan.

*As each oven is different, adjust the temperature according to your oven.  Using this temperature, I get a nice tall cake but it still has cracks at the top. 

 After the cake is removed from the pan, chilled the cake in the fridge for a while as it will make the texture a bit firmer, easier for cutting.


:: My pinkie sponge cake ::

Next is to prepare the hearts to be embedded into the chocolate cake. The original tutorial is shared by Karmarie from Cake Central

Preparing the Hearts

1. Slice the cake into 12 equal portions (see drawings below)
heart-in-center-cake-liancanbake.blogspot.sg
:: Top view of how the cake should be sliced ::

Golden-Sponge-Cake-liancanbake.blogspot.sg
:: The texture of the cake is very fine ::

:: Side view of the cake slice ::

:: The heart shape cut out ::

2. Take one slice and lay it flat and use a cookier cutter to cut out the heart shape.
3.To ensure that the heart shape is cut in the same position of each slice, cut out a tracing paper to be same size of the cake slice, position the cookie cutter onto the tracing paper, trace out the outline and cut out the heart shape hole in the tracing paper.
4. Continue to cut out the heart shape for every slice, using the tracing paper as guideline so that you know where to cut.
5. Arrange the cut out hearts into circular shape with the pointed side on top as tight as possible so that there are no gaps in between. (see photo below) I arrange as I cut each piece so that I won’t mixed up the position of the hearts.

surprise-heart-in-center-cake-liancanbake.blogspot.sg
:: Circular arrangement of the hearts cut out ::

Next step is to prepare the chocolate cake. The chocolate cake recipe is modified from the Golden Sponge Cake above and the method is the same.

Chocolate Sponge Cake Recipe
(6 inch removable base cake pan)

Ingredients:

50g butter (I used non-salted)
40g cake flour (sifted)
10g non-sweeten cocoa powder (sieved together with cake flour)
6g corn starch (sieved together with cake flour)
3 large egg yolks (my egg size is approx 70g with shell)
55g chocolate milk (I used HL chocolate milk)


3 large egg whites (my egg size is approx 70g with shell)
40g caster sugar

Putting the Hearts into the Cake
1. Once the cake batter is ready as per the method above, gently pour some of the cake batter into the cake pan and gently shake the pan so that the batter is leveled.
2. Gently pick up the pre-arranged hearts, keeping their arrangement together while transferring and place and place into the cake pan onto of the batter.
3. Use a ladle and scoop some of the batter and gently fill the cake pan in the outer circumference of the round of hearts first, use 1 hand to hold the hearts to keep them from shifting.
4. Scoop some batter and gently fill into the inner circumference of the round of hearts.
5. Continued this process till all the batter is used up and the hearts are already fully submerged in the batter.
6. Gently tap the bottom of the pan and bake in the pre-heated oven at 145 degree for 50min or till the skewer comes out clean.
7. Invert the cake pan and let it completely cool before remove from pan.

*The cake is meant to served inverted when it is out of the cake pan, meaning the bottom part should be at the top so that the heart shape will appear up right. If the cake has domed, shaved off the dome to get a flat surface.


chocolate-sponge-cake-liancanbake.blogspot.sg
:: It looks ordinary but the surprise is inside ::


Covering the Cake with Ganache

Ingredients:
1/2 cup whip cream
1 cup semi sweet chocolate chips

How to do:
1. Heat up the whip cream in a sauce pan with low heat till it starts to bubble.
2. Pour over the chocolate chips and keep stirring till all the chocolate melts.
3. Let it stand for a while and stir occasionally.
4. The ganache is ready for use once it is slightly cooled and thicken
5. Place the cake on a wire rack with a bigger tray behind so that the ganache can drip down.
6. Pour ganache on top of the cake*, and gently swirl the cake in circular motion so that the ganache will flow and cover the whole cake. Continue the process till the whole cake is full coated with ganache

*To get a smoother finish, frost the cake with whip cream and chill in the fridge before applying the ganache. As seen from the photo, the top of my cake is smoother as I only frost the top of the cake, the side is without the whip cream layer.

I worked on the cake for 2 days that I was so tired at the end of it. So I went for minimalist look, just decor with some jelly beans and birthday girl's name in white chocolate.

Nothing complicated but I am loving this look ~ simple, clean and very modern!

:: Chocolate Ganache Cake with Surprise Hearts inside::

:: Surprise Heart Reveals! Photo courtesy of the Birthday Gal ::

Happy Birthday, Jolene! Thank you for loving the cake!

Monday, July 6, 2015

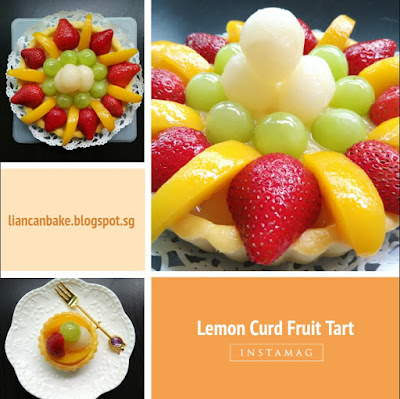
Lemon Curd Fruit Tart - A blend of tartness and sweetness!


Have been resting quite a bit since the last Father’s Day project. Doing a lot of readings on recipes and methods to prepare for my next big project ~ my baby’s first birthday!

Yesterday, Hubby said wanted to go visit his uncles & auntie, so that finally got my engine working! I thought of doing something simple and low failure rate for them. A fruit tart immediately came into my mind.

My usual fruit tart has a layer of crème d'amande which uses almond powder and top with custard and whip cream. As my cousin has an allergic reaction to nuts, I have to forgo the crème d’amande layer. I am thinking of having something more refreshing for after dinner dessert, as I know dinner is always heavy with these relatives. I looked through my fridge and saw those lovely lemons and decided to do a lemon curd fruit tart.

Lemon-Curd-Strawberry-peach-Tart
:: A Colorful Lemon Curd Fruity Tart ::

This tart is baked in 6 inch removable base tart tin in my Morris tabletop oven.

Tart Shell Ingredients:
Recipe adapted from My Mind Patch

45g salted butter, softened & cut into small pieces
20g icing sugar
1 egg yolk (I used small yolk, approx 18g)
90g all-purpose flour

How to do:

1. Cream the soften butter till it is smooth and pale yellow. I used hand whisk.
2. Add icing sugar and continue to cream till light and fluffy.
3. Add in the egg yolk and continue to mix till well combined.
4. Sift in the flour in 2 steps and using a spatula, mix well for each addition till the mixture becomes a soft dough.
5. Shape the dough into a ball and placed on a piece of cling wrap that is big enough to cover a round out dough of 6 inch round.
6. Put another cling wrap on top of the dough, flatten it and started to roll out evenly into a round, big enough to cover your tart tin base with some allowance for the tin height
7. Place the dough sheet in the fridge to chill for about 10 min.
8. Take out the dough sheet (should feel a bit stiff) and place it over the tart tin.
9. Press the dough sheet against the tin. If the dough sheet breaks, just fill up the holes by pressing the dough together.
10. Use a roller to roll on the top of the tart tin and the dough will be flatted to the tin height. Continue with step 9 and 10 till you are satisfied with the evenness of the tart shell.
11. Use a fork to make holes at the base of the tart.

:: makes holes on the base of tart shell before baking ::

12. Bake in pre-heated oven at 170 degree (shown on my oven thermometer) for 10 min.
13. Bring out from the oven and egg wash* the tart shell and return to oven for another 8 – 10min or till the tart shell turns light brown and the sides shrink slightly away from the tin.
14. Remove from oven, unmold once the moulds are slightly cooled down enough for hands to handle. Continue to let it cool on a metal rack.

*I use a bit of egg yolk (from the lemon curd ingredients) + 1 teaspoon of water and 1 drop of oil.
**Can use both non-stick or aluminum tart tin but DO NOT grease the tart tin.


Lemon Curd Ingredients:
Recipe adapted from Nasi Lemak Lover

75ml lemon juices (approx 3 small lemons)
75g caster sugar or to taste
15g unsalted butter
Lemon zest from 2 small lemons
2 small egg yolks (I remove a bit for egg washing the tart, approx 1/4 tsp)
1 & 1/2 tbsp cornstarch
3 tbsp water

How to do:

1. Melt the sugar and butter in the lemon juice together with the zest over heat. Remove the saucepan once it starts to bubble.
2. Mix the cornstarch and water till they are well-combined, and add in the egg yolks and mix well.
3. Add the egg yolk mixture to the lemon juice mixture in the saucepan.
4. Return the saucepan to stove and use a hand whisk and continue to stir over low heat.
5. After a few minutes, you will start to feel the mixture starts to thicken.
6. Remove the pan from heat and continue to stir. Due to the residual heat, it will continue to thicken.
7. If the curd doesn’t thicken to the right consistency, return to low heat for a a few second and continue to stir. Do not allow the curd to boil.
8. The curd’s consistency should be something like japanese mayonnaise, soft but should be able to hold its shape.
9. Pour the curd through a fine mesh sieve to attain a smoother consistency.


Assembling the Tart:

1. Scoop the lemon curd into the tart shell. The curd should not feel hot at this point.
2. Place the tart in a covered container in the fridge for about 15 min.
3. Meanwhile prepare your favorite fruits for topping the tart. Wash & pat dry.
4. Bring out the tart after 15 min, the curd should feel a bit stiffer.
5. Arrange your favorite fruits onto according to your preference.
6. Glaze the fruits to achieve the shiny look.
7. Return to fridge till ready to serve.

*To glaze the fruits, can use apricot jam or piping jelly etc. I used 2 & 1/2 tbsp of can peach syrup + 1 tsp of gelatin powder. Simply dissolve the gelatin powder in the peach syrup over water bath.

Lemon-Curd-Fruit-Tart
:: Love the Symmetrical Arrangement! ::

What I love about fruit tarts is that it is such a refreshing dessert after a full dinner. The lemon curd has the tartness that helps to refresh your palate. On top of that, who doesn’t love a beautiful and colorful fruit tart?

Mini-Lemon-Curd-Tart
:: The Mini Version ~ Great as Dessert Canapes ::